
")
How to Take a Picture on a Chromebook (Step-by-Step Guide)
Taking a picture on a Chromebook is quick and easy, whether you’re using the built-in camera app, keyboard shortcuts, or external tools. In this guide, you’ll learn how to take a picture on a Chromebook, including how to take a picture on a Chromebook with keys, even if you’re a beginner.
Table of Contents
How to Take a Picture on a Chromebook Using the Camera App
The simplest way to take a picture on a Chromebook is through the built-in Camera app, which comes preinstalled on all ChromeOS devices.
Steps to Take a Picture on a Chromebook:
- Click the Launcher (circle icon) in the bottom-left corner.
- Search for and open the Camera app.
- Make sure Camera mode is selected (not Video).
- Click the shutter button to take a photo.
Your photo will be automatically saved to the Downloads folder.
How to Take a Picture on a Chromebook With Keys (Keyboard Shortcut)
If you want a faster way, you can use Chromebook keyboard shortcuts. While there is no direct “camera shortcut,” you can take a picture using screen capture keys, which is useful for snapshots or documentation.
Screenshot Keyboard Shortcuts:
- Full screen screenshot:
Ctrl + Show Windows - Partial screenshot:
Ctrl + Shift + Show Windows
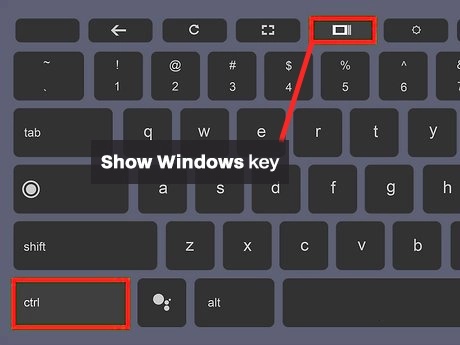
💡 The Show Windows key looks like a rectangle with two lines and replaces the F5 key on Chromebooks.
These shortcuts capture your screen instead of the webcam, but they’re often used when users search for how to take a picture on a Chromebook with keys.
How to Take a Picture on a Chromebook Using Tablet Mode
If your Chromebook has a touchscreen or can flip into tablet mode, taking a picture works like a smartphone.
Steps:
- Flip your Chromebook into tablet mode.
- Open the Camera app.
- Tap the on-screen shutter button.
- The photo is saved automatically.
This method is ideal for Chromebook tablets or 2-in-1 devices.
Where Are Photos Saved on a Chromebook?
After you take a picture on a Chromebook, your photos are stored in:
- Files app → Downloads folder
You can move, rename, or upload your photos from there.
How to Take a Picture on a Chromebook Using an External Webcam
If your Chromebook is connected to an external webcam, ChromeOS will automatically detect it.
How it works:
- Plug in the external webcam.
- Open the Camera app.
- Switch the camera source if prompted.
- Take your picture as usual.
This is useful for higher-quality photos or professional setups.
Troubleshooting: Camera Not Working on Chromebook
If you’re unable to take a picture on your Chromebook, try these fixes:
- Restart your Chromebook
- Check camera permissions in Settings
- Close other apps using the camera
- Update ChromeOS to the latest version
Final Thoughts
Now you know how to take a picture on a Chromebook, whether you’re using the Camera app, tablet mode, or keyboard shortcuts. While Chromebooks don’t have a direct camera key shortcut, the built-in tools make taking photos simple and efficient.
If you’re using a Chromebook for school, work, or content creation, mastering these steps will save you time.